BonaireTalk Discussion Group
Bonaire Photography & Videography: Color correction using Elements
Bonaire Talk: Bonaire Photography & Videography: Archives: Archives 2006- 2007: Archives - 2006-04-01 to 2006-08-01: Color correction using Elements
Top of pagePrevious messageNext messageBottom of page Link to this message  By Karen Dancheck (New BonaireTalk Poster - Post #9) on Tuesday, June 6, 2006 - 10:57 pm:     Edit PostPrint Post

Just got back from two fabulous weeks in Boniare. I am working on editing some of my photos. Wondering what is the best way (if there is one) to take some of the blue out of a photo. "Auto" correction of any kind doesn't look right, nor does the "color variations" option. I have a few really well composed shots, but the blue needs to be reduced. Any advice would be helpful. Thanks


Top of pagePrevious messageNext messageBottom of page Link to this message  By herman mowery (Experienced BonaireTalker - Post #594) on Wednesday, June 7, 2006 - 12:31 am:     Edit PostPrint Post

If auto does not cut it, try this.
Pull down "Enhance" > adjust color>remove color cast.

Once you have that up, select a gray, black or white area and click there. I find zooming in helps nail the right spot. Lots of times this works by itself but some times it gives a odd reddish green color to grays, tanks especially. The good news is, once you recognize this odd color on tanks, the auto correction seems to work a lot better. What ever you use, save a base copy before messing with the picture, that way when you totally mess it up (voice of experience :-) ) you have a clean copy to start over with.


Top of pagePrevious messageNext messageBottom of page Link to this message  By herman mowery (Experienced BonaireTalker - Post #595) on Wednesday, June 7, 2006 - 12:32 am:     Edit PostPrint Post

If you want, post one and we can play with it some.


Top of pagePrevious messageNext messageBottom of page Link to this message  By Cecil (Supreme BonaireTalker - Post #4722) on Wednesday, June 7, 2006 - 8:27 am:     Edit PostPrint Post

Karen really blue pictures are pretty tough to fix, sometimes the best option is to switch it to Black and White.
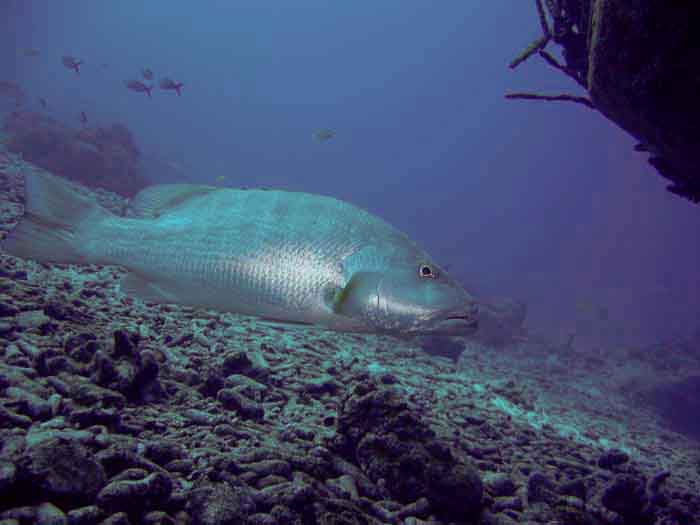
I use color variations to fix color all the time, one issue with that technique is the default adjustment is to much. Look down on the lower left of that screen, there is a slide bar that is the amount of color change per click. I move this to the left, then every time you change the color it does it only a little. Much better control.

The two other options are to use the Mandrake process to remove all the colors and then rebuild. If you go here and search for Mandrake you will find this process. The other option is to leave it alone and accept it. For distant subjects UW, this is what I prefer.

Of course the right answer is get close enough for the flash to work.

Blue and loving it.
Snapper


Top of pagePrevious messageNext messageBottom of page Link to this message  By Freddie (Supreme BonaireTalker - Post #7430) on Wednesday, June 7, 2006 - 8:50 am:     Edit PostPrint Post

tweaked a bit:
P


Top of pagePrevious messageNext messageBottom of page Link to this message  By Cecil (Supreme BonaireTalker - Post #4724) on Wednesday, June 7, 2006 - 9:13 am:     Edit PostPrint Post

Oh Freddie, you're killing me here. That was suppose to be an example of a picture that does not need tweaking and what do you do, tweak it. LOL.

Beyond the humor, it is interesting the result you got. I would not of thought there were any reds in that picture, but you did get a little to come out. I still like the original better.


Top of pagePrevious messageNext messageBottom of page Link to this message  By Grasshopper (BonaireTalk Deity - Post #18379) on Wednesday, June 7, 2006 - 10:18 am:     Edit PostPrint Post

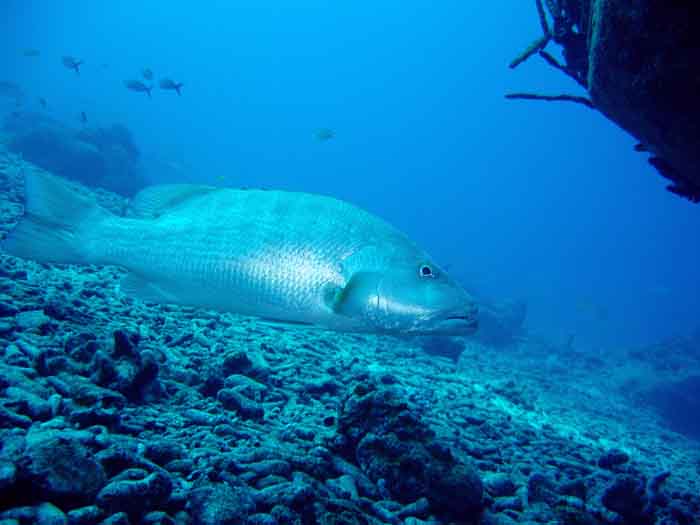
I like the thermoclines in Freddie's...lol


Top of pagePrevious messageNext messageBottom of page Link to this message  By Karen Dancheck (New BonaireTalk Poster - Post #10) on Wednesday, June 7, 2006 - 2:19 pm:     Edit PostPrint Post

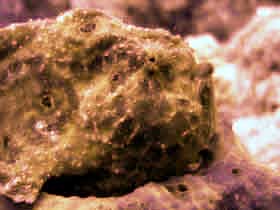
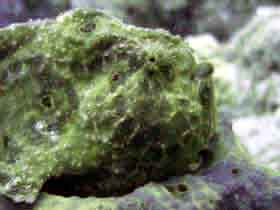
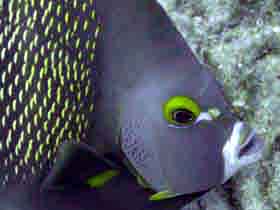
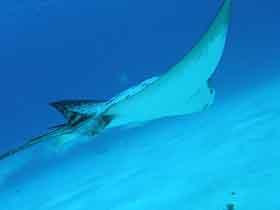
Here are a few photos that I am working on.
/Users/chickster/Desktop/frogfish for bt.jpg
/Users/chickster/Desktop/ray for bt.jpg
/Users/chickster/Desktop/a fish for bt.jpg


Top of pagePrevious messageNext messageBottom of page Link to this message  By Grasshopper (BonaireTalk Deity - Post #18384) on Wednesday, June 7, 2006 - 2:24 pm:     Edit PostPrint Post

Karen, try:
\image{name of your photo here}


Top of pagePrevious messageNext messageBottom of page Link to this message  By Karen Dancheck (BonaireTalker - Post #15) on Wednesday, June 7, 2006 - 3:57 pm:     Edit PostPrint Post

Ok I figured it out. Here are the "blue" photos I am working on.
angelfish
ray
frogfish

I resized the images in Elements, but they look very small. I did several tests and it looks like this is the largest I can make the images to upload. Is there any way to make the images larger and keep them under 50K?


Top of pagePrevious messageNext messageBottom of page Link to this message  By Freddie (Supreme BonaireTalker - Post #7437) on Wednesday, June 7, 2006 - 4:02 pm:     Edit PostPrint Post

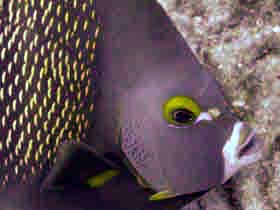
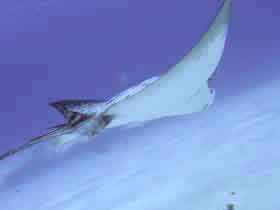
Hi Karen send me the orginials and I will see if I can post them larger.. scubahb@optonline.net in the mean time here is your angel without the blue.. also your froggie the ray however is best left blue..
PP


Top of pagePrevious messageNext messageBottom of page Link to this message  By bob (Extraordinary BonaireTalker - Post #1569) on Wednesday, June 7, 2006 - 4:37 pm:     Edit PostPrint Post

has anyone seen "light table" from adobe? someone at work thinks i ought to be checking it out?

comments?


Top of pagePrevious messageNext messageBottom of page Link to this message  By bob (Extraordinary BonaireTalker - Post #1572) on Thursday, June 8, 2006 - 5:42 pm:     Edit PostPrint Post

that's "lightroom" and it is still in beta and a windows version is not yet available and it looks like it will have some nice tools for "developing" pictures from the RAW format...looks like it could be expensive too;)

(maybe i need this product at work;))

does have some impressive looking batch capabilities too...

guess i will at least shoot a stick full of stuff in RAW so i have something to play with later...


Top of pagePrevious messageNext messageBottom of page Link to this message  By Doug Grawe (BonaireTalker - Post #20) on Sunday, July 16, 2006 - 5:11 pm:     Edit PostPrint Post

hello all, I was just sitting here color correcting some of my pix from my recent trip to Bonaire. I just happened upon this thread and thought I'd offer my technique if anyone is interested. Its a little long and involved, but it seems to produce good results every time with no guess work. I'll leave an example of the correction.
bontalk2f


Top of pagePrevious messageNext messageBottom of page Link to this message  By Doug Grawe (BonaireTalker - Post #21) on Sunday, July 16, 2006 - 5:19 pm:     Edit PostPrint Post

oops, hit post too fast. I can type up the steps if anyone is interested.
a couple more examples, again, no guess work here, same steps each time

bontalk4
bontalk4f
bontalk3
bontalk3f


Top of pagePrevious messageNext messageBottom of page Link to this message  By marge karalis (BonaireTalker - Post #80) on Sunday, July 16, 2006 - 8:58 pm:     Edit PostPrint Post

Ok, what are the steps for a dummy to understand. I just installed photoshop


Top of pagePrevious messageNext messageBottom of page Link to this message  By bob (Extraordinary BonaireTalker - Post #1639) on Sunday, July 16, 2006 - 9:22 pm:     Edit PostPrint Post

the attached file is a "action" file for correcting for red underwater...if you have photoshop 6.0 or later (not photoshop elements) you can try this out on some pics...

an easy correction to try is simply "auto levels"
or in photoshop elements "auto color correction"

back to the action file - reverse engineering that script might be good for understanding how this stuff works - when you do, let me know;)

application/octet-streamunderwater_atn
Underwater.atn (2.4 k)


Top of pagePrevious messageNext messageBottom of page Link to this message  By Freddie (Supreme BonaireTalker - Post #7580) on Sunday, July 16, 2006 - 9:27 pm:     Edit PostPrint Post

bob I can't open that attachment could you put in in a Word format please?? hummm but I guess you will have to take the action out then oh well.. what program created the attachment?


Top of pagePrevious messageNext messageBottom of page Link to this message  By Freddie (Supreme BonaireTalker - Post #7581) on Sunday, July 16, 2006 - 9:29 pm:     Edit PostPrint Post

Doug there are always a few of us that would like an easier way to correct photos.. could you please post the steps?? thanks


Top of pagePrevious messageNext messageBottom of page Link to this message  By Doug Grawe (BonaireTalker - Post #24) on Monday, July 17, 2006 - 5:12 pm:     Edit PostPrint Post

Be happy to post the steps, mind you its quite a few steps, not a one button kind of thing. let me try to put it into word first then copy and paste it.

Bob, I don't have full blown photoshop, so I couldn't look at the action file, but I'd bet the technique I use with elements is prety close. If there is any way for you to look at it and let me know if it differs I'd appreciate it, always trying to get more out of elements.

I'll post the steps later today.


Top of pagePrevious messageNext messageBottom of page Link to this message  By bob (Extraordinary BonaireTalker - Post #1641) on Monday, July 17, 2006 - 5:35 pm:     Edit PostPrint Post

freddie,

i do not think the .ATN file is text. probably some binary or something that requires photoshop 6.0 to open. however, once it has been opened in photoshop one can examine the steps...i was hoping someone else would volunteer;)

really though, in most cases, the photoshop "auto-levels" or "auto color correction" do as well or better...this underwater.atn can leave things tinted a bit red...

we'll see...


Top of pagePrevious messageNext messageBottom of page Link to this message  By Doug Grawe (BonaireTalker - Post #25) on Monday, July 17, 2006 - 6:01 pm:     Edit PostPrint Post

OK, here it goes. I hope that this cut and past works. I wish I could give credit to the person that created this technique but one of my students (I'm a highschool teacher)showed me how to do it and I don't know where he learned it.

your milage may vary

OK, I assume that the newer versions of elements are still set up like my version 2.0

The ‘layers’ tab is on the upper right side of the screen, there should be 7 tabs:
<how><filters><effects><layer><undo><layers><hints>

<layers> refers to the work done in the layers tab,
instructions in (parenthesis) refers to operations using the toolbar on top of the screen

The process is as follows:

1) Create 3 duplicate layers of the original photo (Layer > Duplicate Layer > OK) (Layer > Duplicate Layer > OK) (Layer > Duplicate Layer > OK)

the layers will probably be called “background copy, background copy 2 and background copy 3”

2) Make the middle duplicate layer active by single clicking on it in the <layers> tab

click on the <layers> tab, there will be a drop down with 4 pictures click on the second picture from the top, “background copy 2” it should highlight.

3) Fill that layer with 50% gray (Edit > Fill > 50% Gray, 100% opacity, normal)

4) Make the top duplicate layer active by single clicking on it in the <layers> tab.
Change that layers blending mode to 'Luminosity' there should be a drop down arrow in the <layers> tab that says “normal”, “luminosity” should be the last option in the drop down

5) Merge that layer down into the middle gray layer. (Layer > Merge Down). You now have a b/w image of your original photo in this layer.

6) Create a new fill layer above this b/w image (Layer > New Fill Layer > Solid Color). Check 'Group with Previous Layer'. Fill this layer with red (R: 255, G: 0, B: 0).

7) make sure the red picture is highlighted in the <layers> tab, Change this layer's blending mode to 'Multiply' <layers> “multiply”

8) Merge it down into the previous layer (the b/w image) (Layer > Merge Down). You've now have a reddish photo.

9) Change the blending mode of the reddish photo to 'Screen' <layers> “screen”

10) Merge it down into the first duplicate layer (Layer > Merge Down). You've now got your original image with a much nicer red.

11) Run Auto-Levels (Image > Adjustments > Auto Levels). See how you like the results. If not undue them (Edit > Undue Auto Levels) and adjust the 'Contrast' and 'Brightness' individually to your liking.

12) When finished, flatten the layers (Layer > Flatten Image), re-size the image to your specifications and save the photo to the desired location. Never over-ride your original photo as you may want to do something else with it in the future.


Top of pagePrevious messageNext messageBottom of page Link to this message  By Doug Grawe (BonaireTalker - Post #26) on Monday, July 17, 2006 - 6:07 pm:     Edit PostPrint Post

Let me know if it works out for you. If you have any questions let me know, I'll be happy to try to answer them. I know it looks rather confusing, but after you do it a couple dozen times.....it can still be confusing :-) For my money it worth the effort though, I'm currently on picture number 308 of 419 from my last trip.


Top of pagePrevious messageNext messageBottom of page Link to this message  By bob (Extraordinary BonaireTalker - Post #1642) on Monday, July 17, 2006 - 6:09 pm:     Edit PostPrint Post

here is the actual dump of the action file:

Underwater
colorcorrect_red
Duplicate current layer
Select layer "Background copy 2"
Fill
Select layer "Background copy 3"
Set current layer
Merge Layers
Make fill layer
Using: fill layer
Slot Color: red
With Group
Type: solid color
Slot Color: RGB color
Red: 255
Green: 0
Blue: 0
Set current layer
Merge Layers
Set current layer
Merge Layers
Hide Background
Levels
Delete Background
Set current layer

sounds like doug has it...too much engineering for me;)


Top of pagePrevious messageNext messageBottom of page Link to this message  By bob (Extraordinary BonaireTalker - Post #1643) on Monday, July 17, 2006 - 6:14 pm:     Edit PostPrint Post

i can see why using a color filter (mostly red) and then using auto levels in photoshop works - same deal - introduce a red layer and then attempt to level it all out...

oh well...


Top of pagePrevious messageNext messageBottom of page Link to this message  By bob (Extraordinary BonaireTalker - Post #1644) on Monday, July 17, 2006 - 7:12 pm:     Edit PostPrint Post

be sure to try the action file on some of your nite-time shots (the grossly underexposed ones;))
not sure but i think i had even more dramatic results with those shots than some of the day times ones...and like cecil (i think) said - just forget the all blue ones - hopeless;(


Top of pagePrevious messageNext messageBottom of page Link to this message  By Karen Dancheck (BonaireTalker - Post #17) on Monday, July 17, 2006 - 9:01 pm:     Edit PostPrint Post

I also love this method of color correcting photos in Elements. It is called the Mandrake Method. There was an old article about it on Scubaboard, but now the link does not seem to work. This method is great for blue/washed out photos. I corrected over 100 photos from our last trip to Bonaire. The steps in the article I have, included a few additional steps. These steps will give you options for the best color choice for that particular image. (I've included steps 10A-11)


The process is as follows:

1) Create 3 duplicate layers of the original photo (Layer > Duplicate Layer > OK) (Layer > Duplicate Layer > OK) (Layer > Duplicate Layer > OK)

the layers will probably be called “background copy, background copy 2 and background copy 3”

2) Make the middle duplicate layer active by single clicking on it in the <layers> tab

click on the <layers> tab, there will be a drop down with 4 pictures click on the second picture from the top, “background copy 2” it should highlight.

3) Fill that layer with 50% gray (Edit > Fill > 50% Gray, 100% opacity, normal)

4) Make the top duplicate layer active by single clicking on it in the <layers> tab.
Change that layers blending mode to 'Luminosity' there should be a drop down arrow in the <layers> tab that says “normal”, “luminosity” should be the last option in the drop down

5) Merge that layer down into the middle gray layer. (Layer > Merge Down). You now have a b/w image of your original photo in this layer.

6) Create a new fill layer above this b/w image (Layer > New Fill Layer > Solid Color). Check 'Group with Previous Layer'. Fill this layer with red (R: 255, G: 0, B: 0).

7) make sure the red picture is highlighted in the <layers> tab, Change this layer's blending mode to 'Multiply' <layers> “multiply”

8) Merge it down into the previous layer (the b/w image) (Layer > Merge Down). You've now have a reddish photo.

9) Change the blending mode of the reddish photo to 'Screen' <layers> “screen”

10) Merge it down into the first duplicate layer (Layer > Merge Down). You've now got your original image with a much nicer red.

10A) Create 3 new layers of the Mandrake Layer (Layer > Duplicate Layer > OK) (Layer > Duplicate Layer > OK) (Layer > Duplicate Layer > OK)

10B) Rename one "mandrake autolevels" and run the AutoLevels command on this layer

10C) Rename the next one "mandrake auto color correction" and run the Auto ColorCorrection command on this layer.

10D) Rename the third "AutoLevelsColor" and run Autolevels followed by Autocolor on this layer.

11) Click off the eyeball icons in the Layers palette (except for the original background layer) and click the eyeballs on and off each of the four Mandrake layers until you find the one you like. Discard the rest by dragging these layers to the trash bin icon in the Layers palette.


12) When finished, flatten the layers (Layer > Flatten Image), re-size the image to your specifications and save the photo to the desired location. Never over-ride your original photo as you may want to do something else with it in the future.


Top of pagePrevious messageNext messageBottom of page Link to this message  By Doug Grawe (BonaireTalker - Post #29) on Monday, July 17, 2006 - 10:28 pm:     Edit PostPrint Post

Thanks Karen, now I've 350 pics to go back and try something new on!! :-)

Oh the things I go through to try to get treat my PBD

There's just no recapturing a Caribbean soul once it's taken its first breath of salt air.


Top of pagePrevious messageNext messageBottom of page Link to this message  By Karen Dancheck (BonaireTalker - Post #18) on Monday, July 17, 2006 - 11:30 pm:     Edit PostPrint Post

Sorry Doug! The process is a bit tedious, but quite addicting after you see the results of one photo.


Visit: The Bonaire WebCams - Current Bonaire images and weather!
The Bonaire Insider - the latest tourism news about Bonaire
The Bonaire Information Site, InfoBonaire
Search Bonaire - Search top Bonaire Web sites


Topics Last Day Last Week Tree View    Getting Started Formatting Troubleshooting    New Messages Keyword Search Contact Moderators Edit Profile Administration